Carpentry
I enjoy working with wood, and I'll often be found in my work area
constructing a piece of furniture or some useful household item.
Much of what I make is constructed from discarded wood or furniture.
Here are some examples.
Bi-Color Shelf Unit
This wall mounted bookcase is secured to the wall using four metal corner braces.
All wood used in constructing this unit is from discarded furniture.
The design is rather simple.
The shelves are 80 centimeters long, 20 deep and 18mm thick.
The two vertical pieces to which the shelves attach are not as deep as the shelves themselves,
giving the unit a more "open" look.
Each shelf is attached to the the sides with four screws (two on each side).
In addition, screws in the back of the braces connect them
to the sides and to the bottom and top shelves, further strenthening the structure.
If properly anchored to the wall, these shelves can saftely support quite a few books.
It mounted to dry wall it should only be done by screwing the corner braces to studs.
In that case the shelf length should be adjusted so that the lateral distance between
the holes in the corner braces is commensurate with the spacing of the studs.
All sections were individually sanded, and two coats of clear varnish were applied to the upper side
of each shelf.
The remaining surfaces were painted brown.
End Table
This is one of my favorites.
I made two of these pine wood end tables.
The table is 50×50cm and 60cm tall.
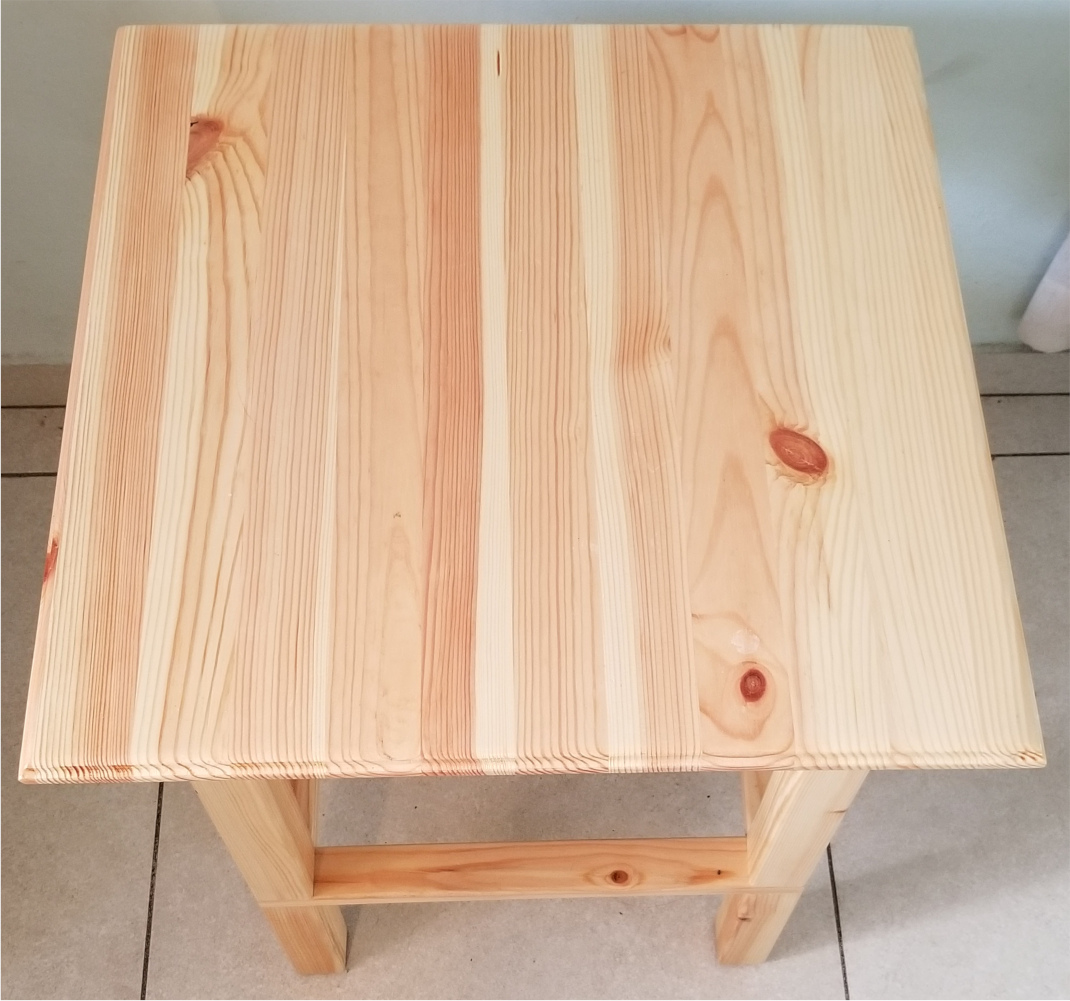
I made the tabletop from an edge-glued panel of pine wood.
I sawed it to size (50×50cm),
trimmed the edges using a trimmer (a small router) with a Roman ogee bit to give the upper
side a decorative flavor, and rounded the underside with a roundover bit in order to
remove the sharpness from the edge.
To increase the stability of the table I incorporated into the design two 40×40cm frames
to which the legs attach.
Two 45×19mm pine wood boards were used to construct them.
Each frame consists of four segments glued together,
with each segment terminating in opposing 45 degree miter cuts.
The frames are visible in the first view.
The legs of the table were cut from 45×45mm wooden posts.
Each leg consists of a top and bottom segment.
The bottom segment attaches to the lower frame (using both screws and glue).
The lower end of the top segment attaches to the upper side of the lower frame (using glue only),
and the upper end to the underside of the upper frame on which sits the tabletop (using screws only).
The top frame attaches to the tabletop with eight screws from the underside.
The pieces were separately sanded and varnished prior to assembly.
It is possible to attach a net to the bottom frame or line it with slats for holding magazines
and such.
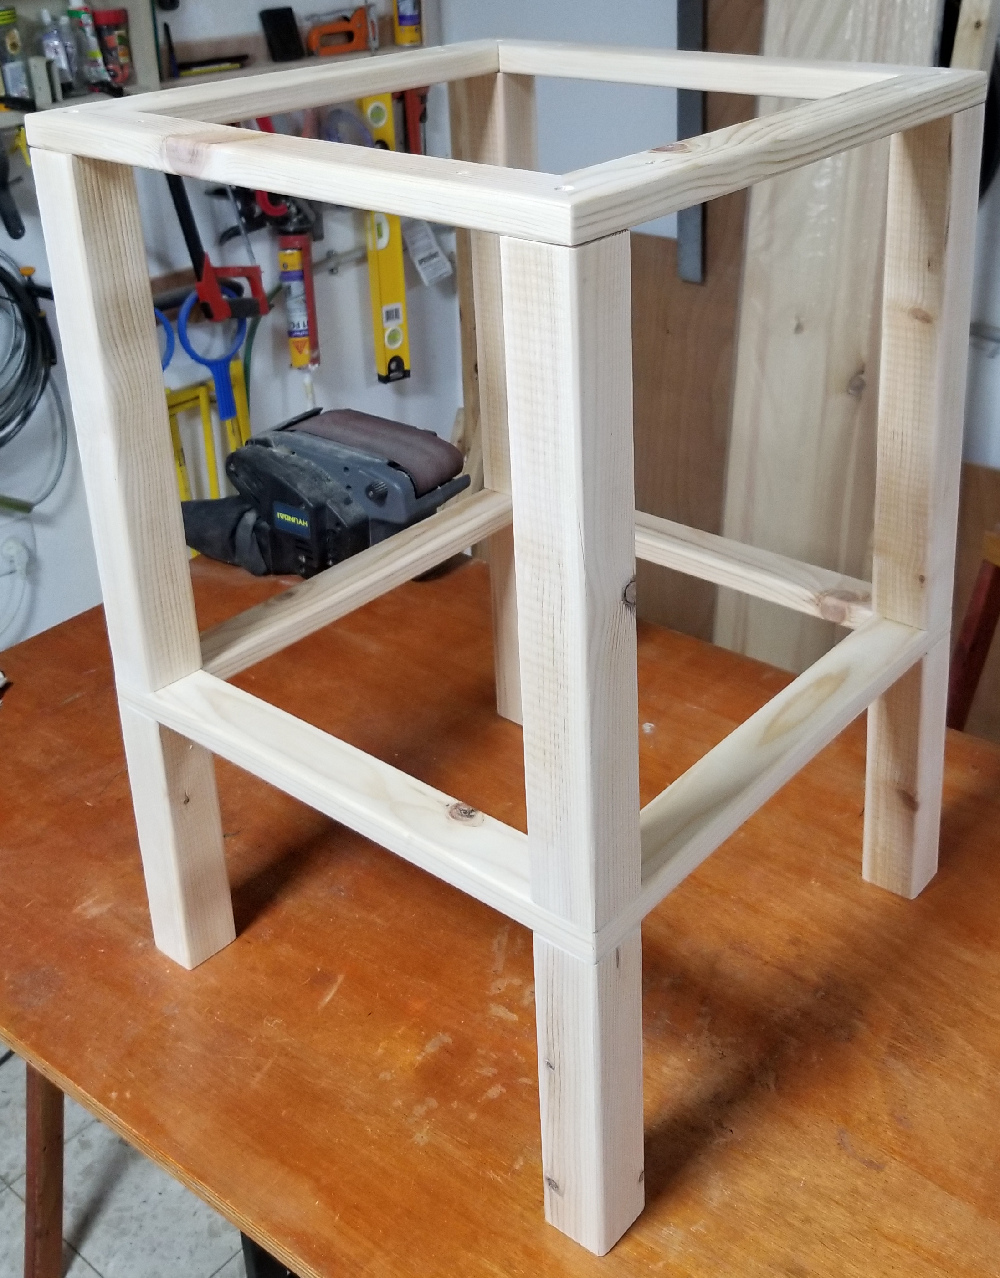
The following image shows the table during construction, prior to painting and attaching the tabletop.
Shoe Shelf
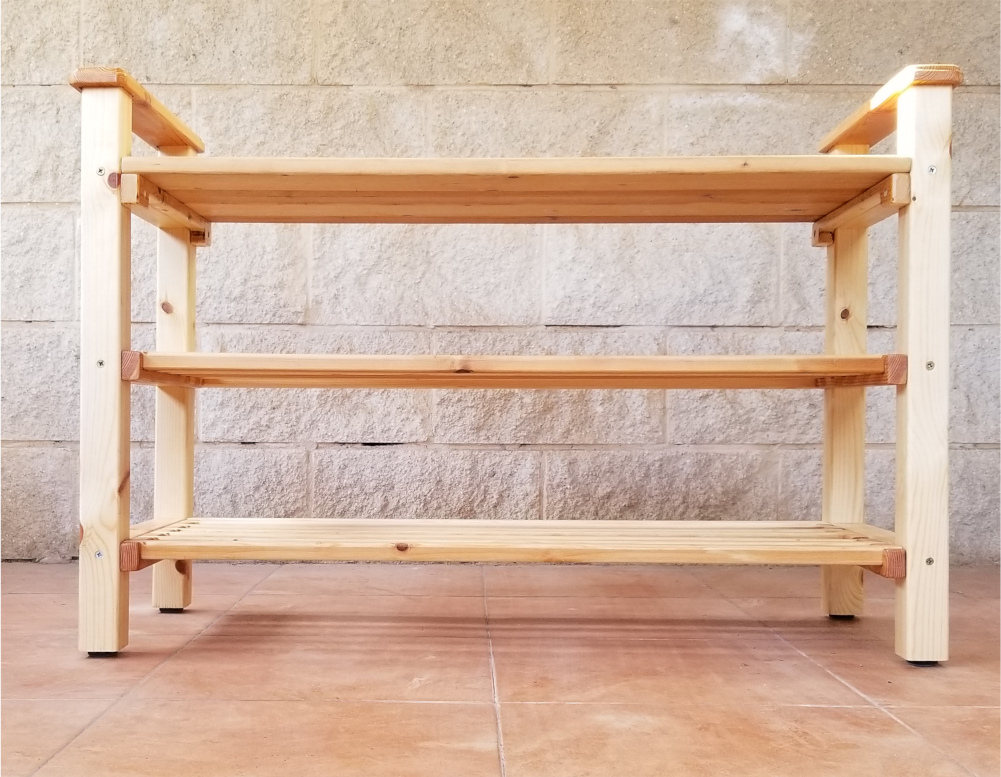
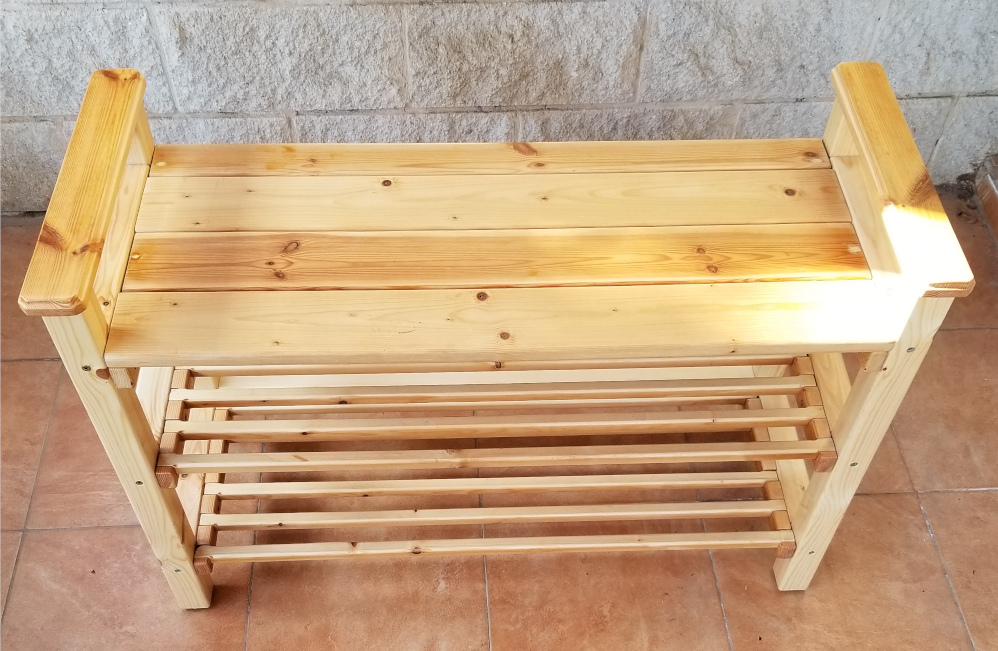
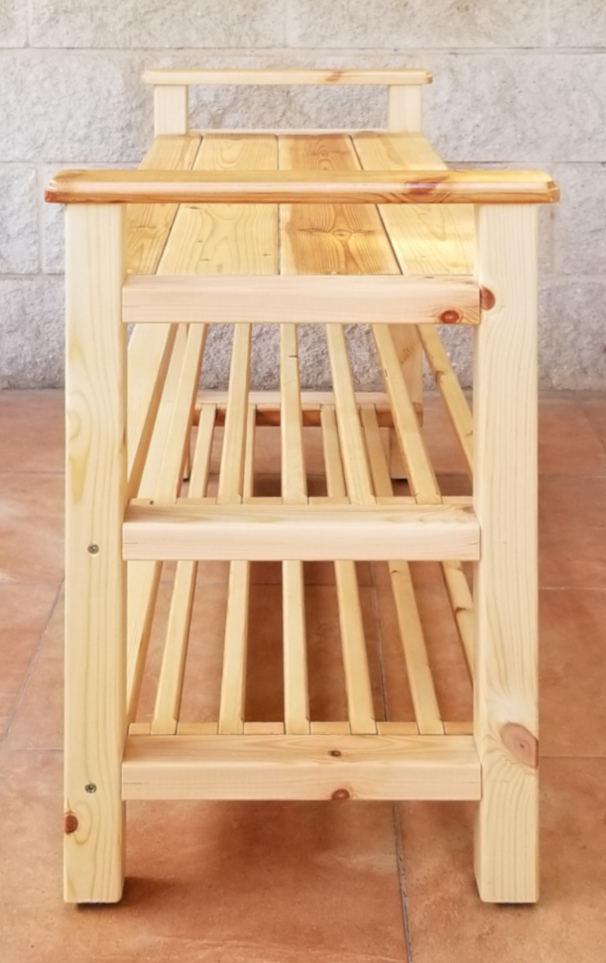
The pine wood shoe shelf pictured here (from three perspectives) was a more intricate piece to design
and construct.
The basic frame consists of sections of 45×45mm wood posts attached together with screws.
The unit hosts three levels: the bottom two are designed to hold shoes;
the upper level is a general purpose shelf.
It is about 90cm wide, with the shelves being about 80cm wide and 34cm deep.
Each shelf can hold between 3 to 4 pairs of shoes.
Six support bars (three on each side) attached to the frame support the shelves in place.
The shelves intended for shoes are not solid, but rather consist of regularly spaced 19×19mm
wooden slats with 3cm gaps in between.
The slats fit snugley into cutouts made in the support bars to which they attach
(to see this in more detail, open the image in a new tab to observe it in full resolution.)
The cutouts were made with a 12mm router straight bit, repeated every 5cm.
Screws from the underside afix the slats to the support bars.
The top shelf consists of four boards resting on the support bars.
Screws from the underside afix them in place.
The vertical frame posts rise above the top shelf by about 10cm.
The decorated rail on top is glued to the vertical posts in the frame.
I kept the cost low by using scrap wood for the shelves, support bars and rails.
The frame was made from purchased wood.
Prior to final assembly I individually sanded the pieces, and applied two coats of nitrocellulose lacquer.
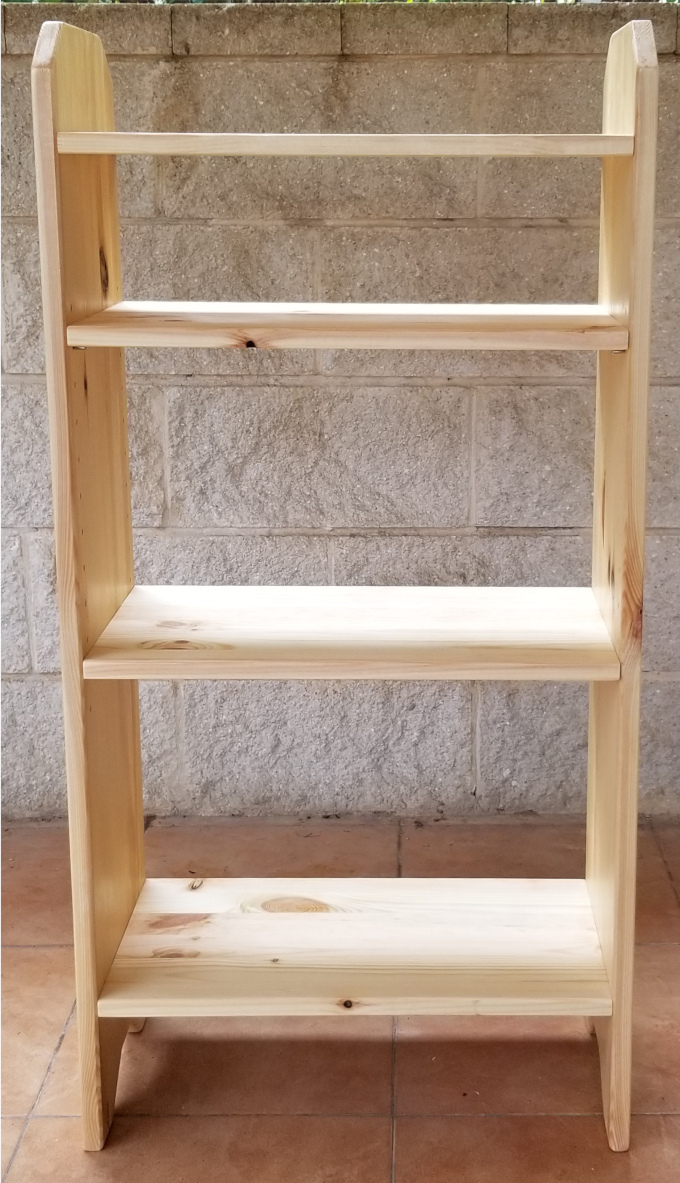
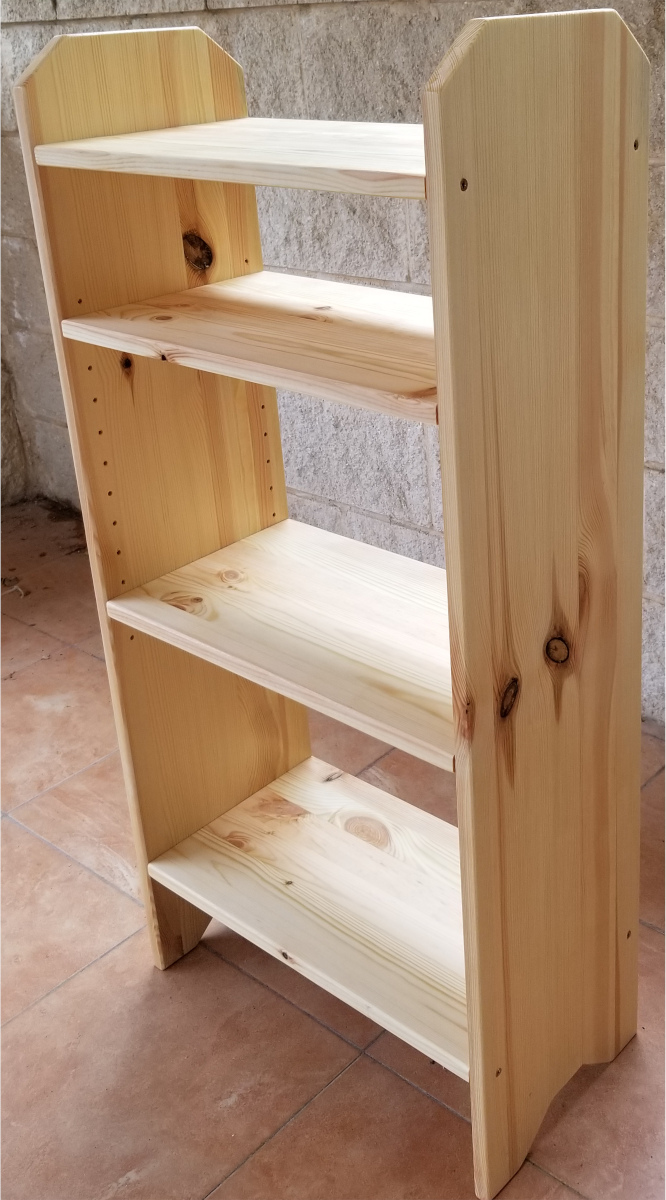
Floor Shelf Unit
The pine wood shelf unit shown here is about a meter high, 48 cm wide and 25 cm deep.
As with most of the shelf units I make it has no backboard
(the wall can serve that purpose).
It is front and back symmetric.
The bottom and top shelves are screwed into the side boards,
and, thus, non-adjustable.
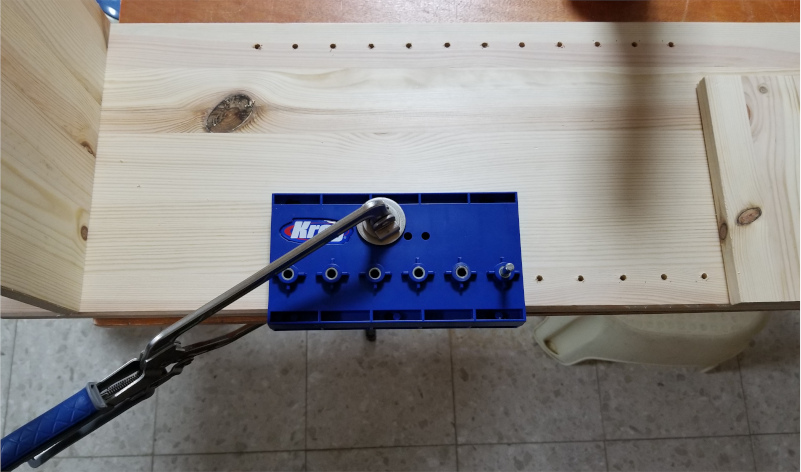
The two middle shelves are supported by standard shelf pins.
Their position can be adjusted by inserting the shelf pins in the desired set of holes.
I used a Kreg shelf pin jig to make these holes (see left image below).
The planks were trimmed with a chamfer router bit to enhance its look
and remove the sharpness from the edges.
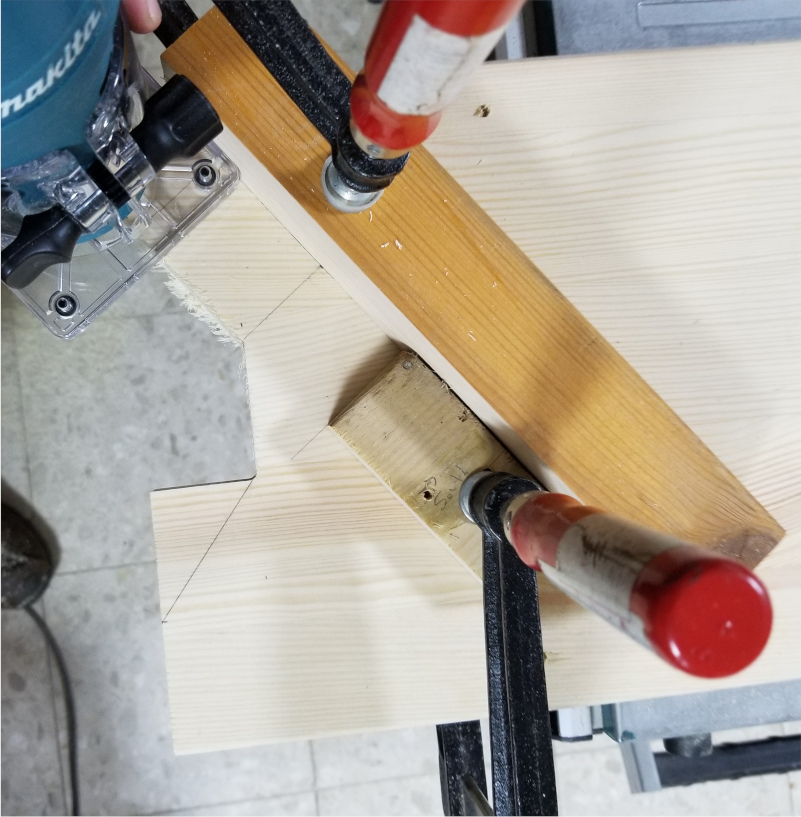
I used a trimmer to remove a trapezoidal section from the bottom of each of the side boards
giving the appearance of having two legs (see right image below).
All sections were individually sanded, and two coats of clear nitrocellulose lacquer were applied
prior to final assembly.
Mirror Frame
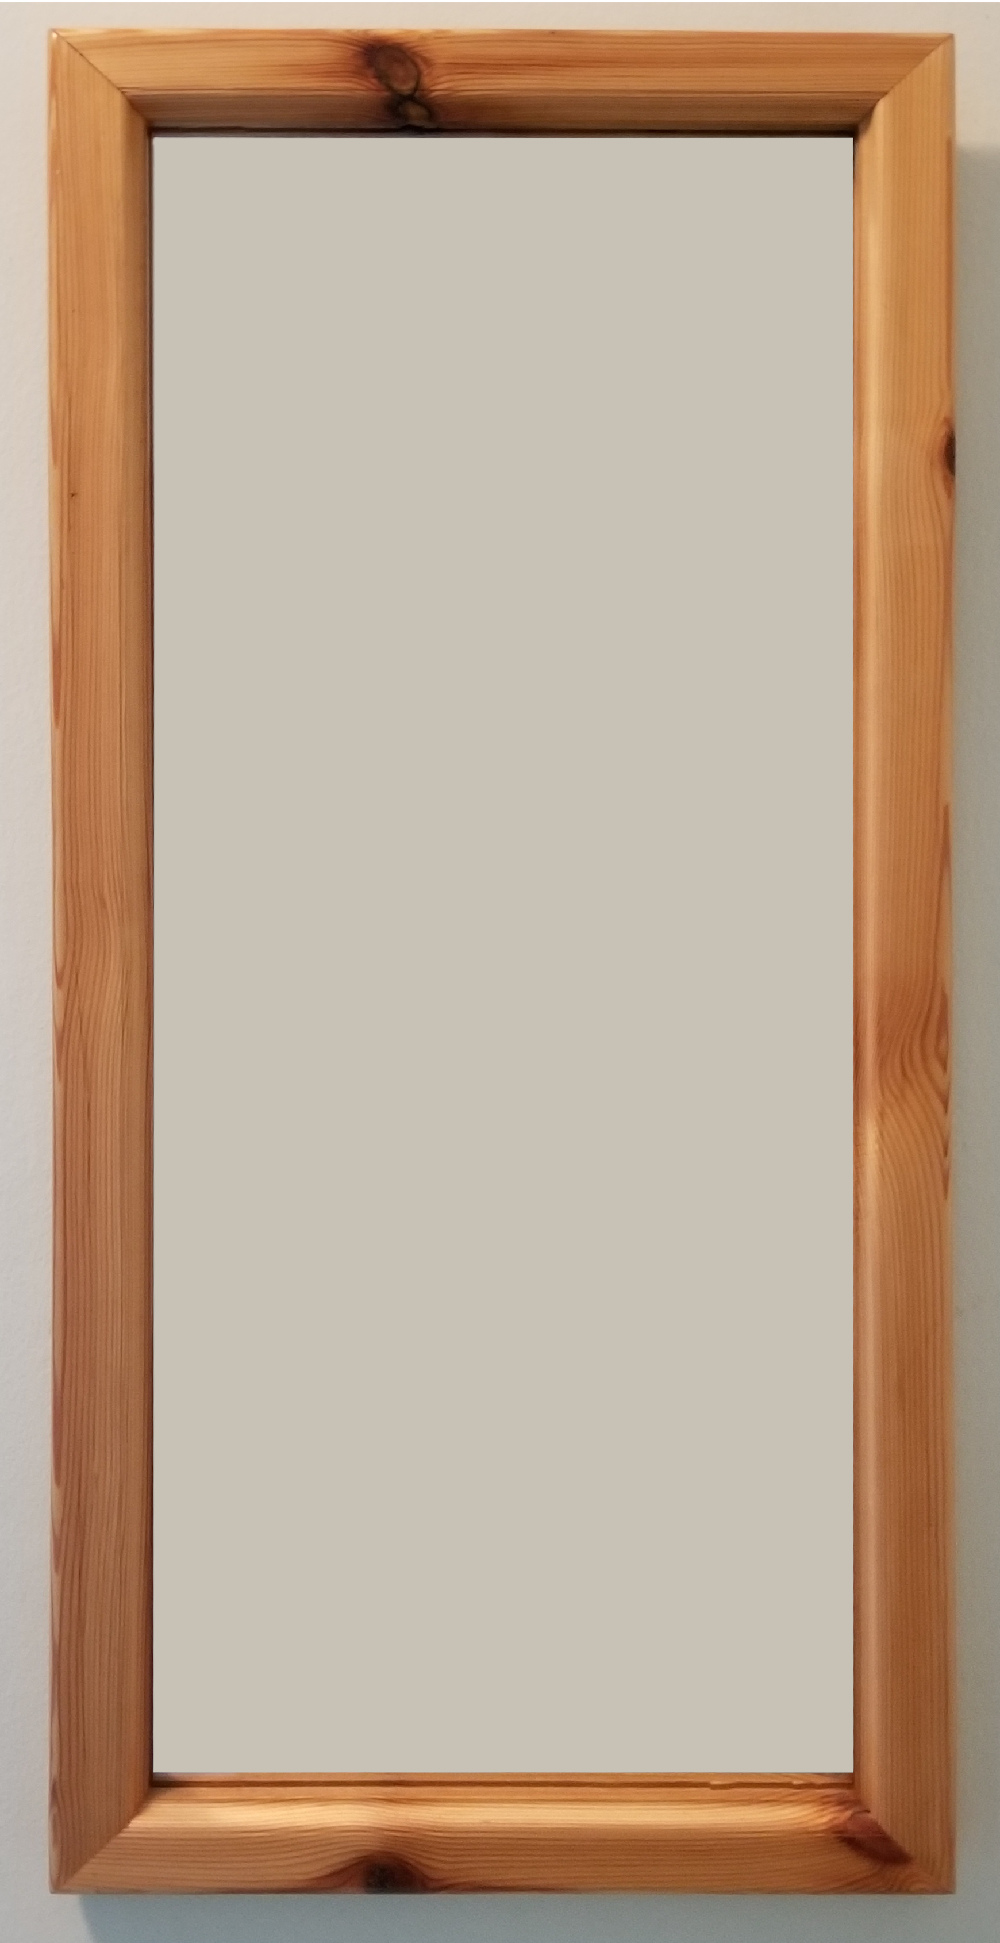
The mirror shown on the left is enclosed in a custom made 64×29cm wooden frame.
To make the frame, I took a piece of scrap pine wood board and cut out 30 mm strips.
I used a Roman ogee bit to make the decorative inner edge of the frame,
and a roundover bit for the outer edge.
On the backside (not shown) I used a router straight bit to carve out a 10mm groove along the inner
edge for inlaying the mirror.
The depth of the groove is commensurate with the thickness of the mirror.
After measuring the length and width of the mirror I determined the dimensions required
for the two vertical segments and the two horizontal segments so that the mirror fits snugley into the frame.
I used a miter saw positioned at ±45 degrees to create the mitered cuts where the
wood segments join.
Finally, I sanded the segments, glued them together and applied two coats of clear varnish.
The mirror was fit in the back and secured to the frame structure with a few small nails,
a sheet of corrugated plastic, and tape.
Porch Swing
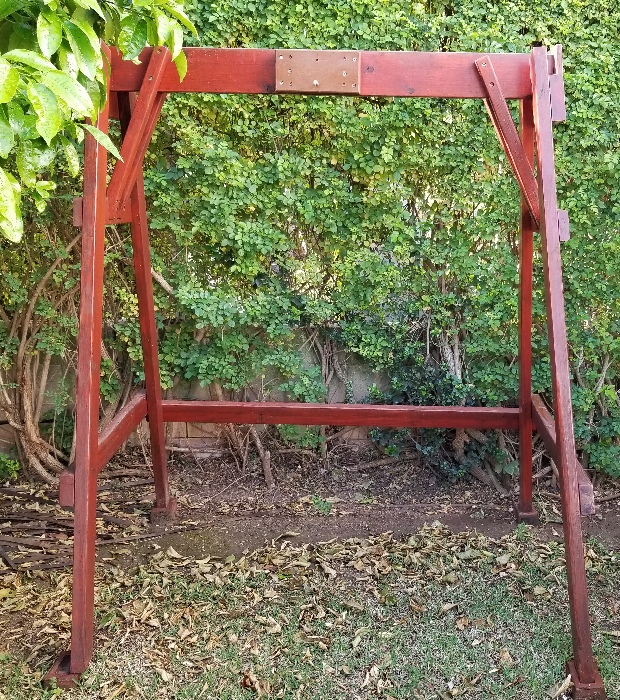
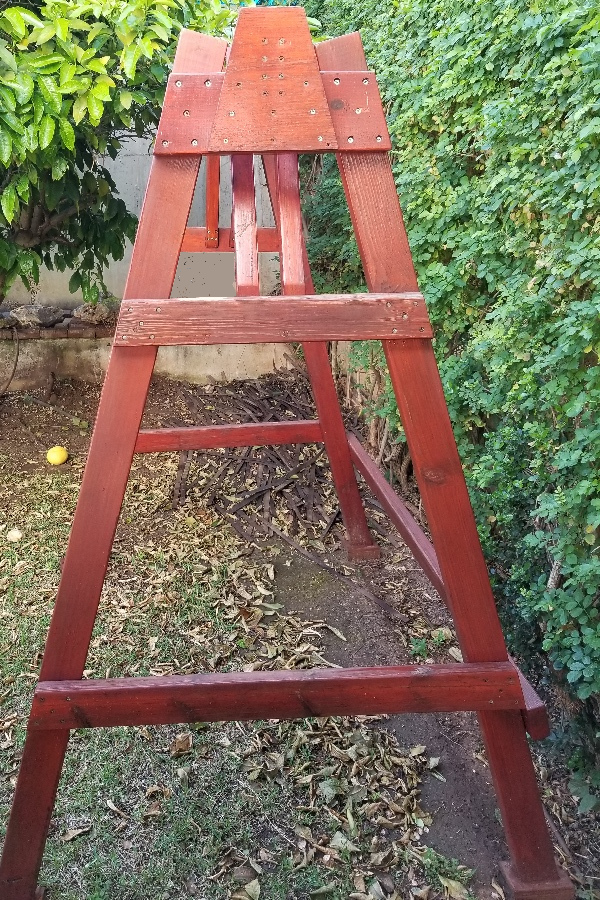
Pictured here is a support structure for either a hammock swing or swinging bench.
A hammock swing would attach at the center.
It was built using mostly left over wood from a pergola.
The legs of the support structure fit snugly into four shoe-like blocks.
In the picture, the front-right shoe slipped off partly,
exposing the carved out indentation into which the leg slips into.
I made these blocks having in mind that the moist ground may cause the wood to rot
in time.
It is easier and cheaper to replace the small blocks than the legs.
The blocks also prevent the structure from sinking into moist or soft ground,
as their contact area with the ground is larger than that of the legs.
I painted the porch swing with two coats of red varnish.
Since this is an outdoor piece, it needs to be repainted every so often to protect the wood.
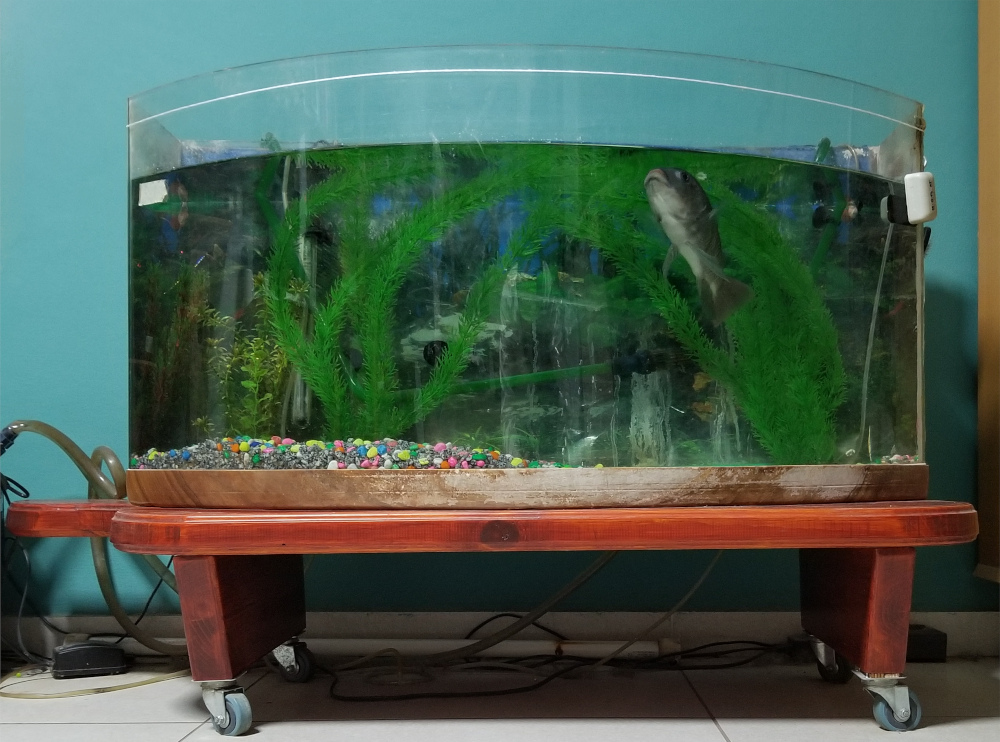
Acquarium Stand
I built the aquarium stand pictured here using scrap pergola wood.
I cut three pieces from 14×4.5cm beams
which I glued together to form a 45mm thick slab 125cm by 42cm.
I used a jig saw to shape it as shown.
The curved protrusion on the left was made to hold the acquarium's air pump
(although the pump has since been replaced with one too large to fit in the
intended space.)
I attached two wooden supports to elevate the stand above the floor.
The front side of each support was cut at an angle for improved aesthetics.
The wheels underneath the stand were intended to give it mobility, however,
the rubber in the wheels quickly succumbed to the weight of the 150 liter tank.
The flattening of the tire can be observed in the head on view (lesson learned —
use wheels rated for the intended weight!)
I used a router with a Roman ogee bit to decorate the edge of the stand.
I sanded the wood and applied two coats of a semi-transparent tinted lacquer.
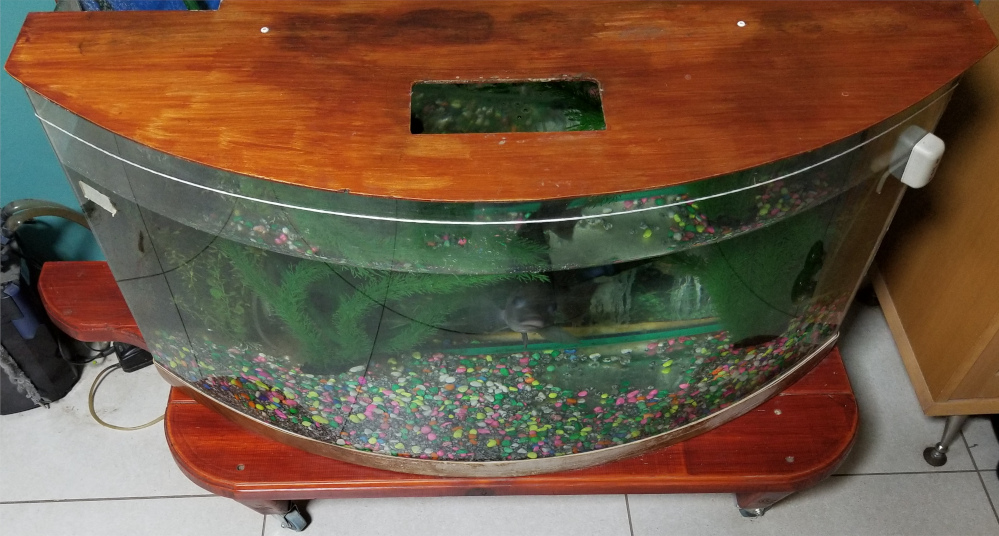
The removable acquarium cover shown on the right image was made from a 6mm sheet of plywood.
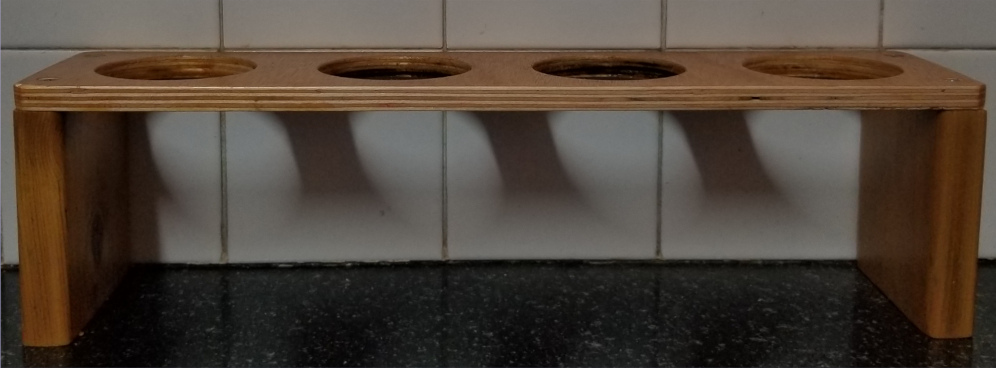
Cup Holder
Besides furniture, I make all sorts of useful household items out of wood
(of which you can probably find a plastic or metal equivalent in the store.)
The cup holder pictured above was made entirely of scraps of wood I had lying around.
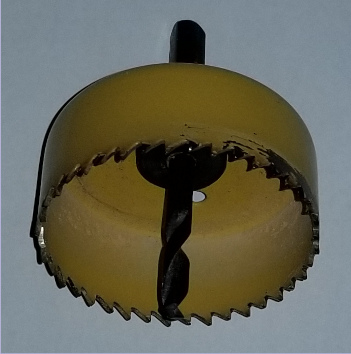
I drilled the holes for placing the cups using a 2½″ (64mm) hole saw (also pictured).
Wall Mounted Utensil Rack
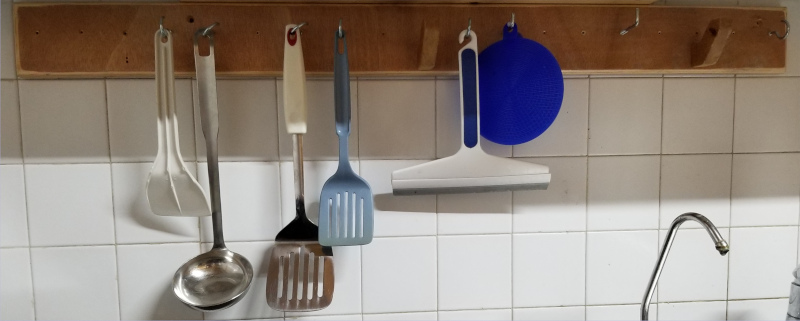
This wall mounted utensil rack was very simple to make.
The rack is made from 18mm plywood.
The edge was rounded with a roundover bit.
The piece was then sanded and lacquered.
I drilled a series of small holes spaced 5cm apart for attaching assorted metallic hooks.
The two wooden hooks are made of pieces of pine wood board.
I used a mitre saw and jig saw to cut each piece into the shape of a hook.
They attach to the rack with screws coming in from the backside.